 |
| WordPress SEO by Yoast : Killer SEO Plugin for your Blog |
This is the guide to configure the SEO by Yoast plugin. When we talk about Best WordPress SEO plugins, WordPress SEO by Yoast gets the spot on because of it's powerful features.
This plugin is a bunch of many other excellent plugins, for example, meta robots plugin, RSS footer plugin and many more. It is most robust plugin outta there. If you want Best result for your SEO, it must be installed properly. Since this plugin offers many advance features, its not easy to Set up WordPress SEO plugin by Yoast. Considering the difficulty level, I am sharing this tutorial, which will help you to set up and configure this plugin for optimum performance.
This guide is current with latest version so please update the yoast SEO plugin before reading.
 |
| WordPress SEO by Yoast |
A Guide to Configure Yoast SEO Plugin
Since it is a powerful plugin hence playing around with this plugin can be tricky for newbie or anything without basic SEO skills, might face difficulties to configure this plugin in a right way. If this plugin is not correctly configured, your blog might not indexed properly. so before we play around with this weapon, lets have a look at the SEO features this plugin provides:- Verify sites in Google, bing and Alexa
- Custom meta titles, descriptions and keywords for each post
- Clean up your blog
- Advanced connectivity to social networks eg. Facebook, twitter and Google+
- Generate Sitemap
- Advanced permalink setting
- Breadcrumbs support
- RSS feed footer plugin settings
- Import settings from other SEO plugins.
- Add Google authorship for single author
- Hide date from Search engine snippets
- Edit robots.txt file and .htaccess files
Setting Up WordPress SEO by Yoast
Please not that the setting that I select are the ones that I recommend. other may have their own preferences hence Advance users can ignore anything that they don’t like. If you are a newbie, and you want to use yoast wordpress SEO plugin like I do, please follow this post.
Step 1. Backup/Data transfer
 |
| Importing feature of WPSEO by Yoast |
Once you have installed and activated wordPress SEO by Yoast, go to SEO- Import and export, and select the plugin you would like to import settings from. but wait! before you begin the import process, don't forget to make a backup of your database, and then use the option that to “delete the old data after import?(recommended)”
Step 2.General settings
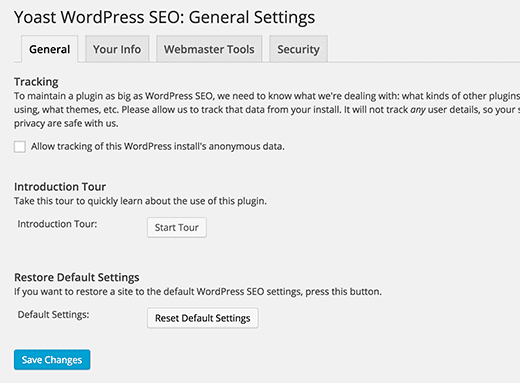
Clicking on the SEO icon will take you to yoast SEO’s general settings page. There is a tracking option, checking it will send anonymous usage data to to plugin author for further development. you can uncheck this option if you dont want to share your usages info. Newbies can take a tour to quickly learn about how to use this plugin. you can also reset this plugin to default setting from this page
- Your info
In this section you need to provide informations about your site and the person or company behind it. your site name could be your site title. If you leave it black, by default wordpress SEO will use your site title as your website name.
Next option is to choose whether your blog is run by a company/organization or an individual. upon choosing company, you will be asked to put in company name and you can upload a company logo.
If you choose a person, you can add a name of the person behind the blog.
- Webmaster Tool
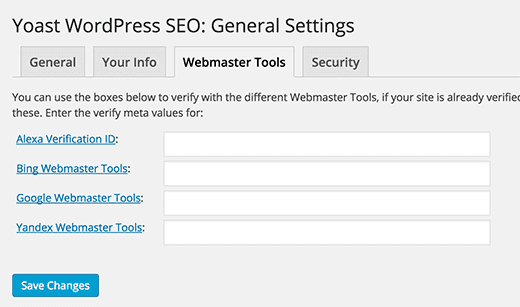
Post initializing the basic thing, this is the actual first step to getting started with this plugin. Its important to submit your site/blog to Google webmaster, Alexa, pinterest, bing and yandex. (learn how to submit a site on Google webmaster and Alexa)
- Security
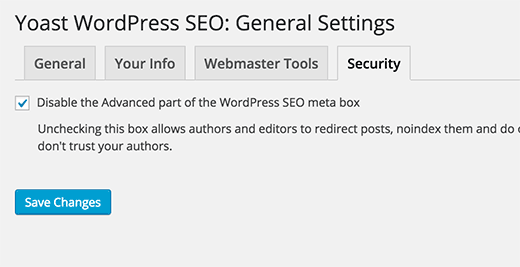 |
| Yoast WordPress SEO Security |
Step 3. Titles and Metas
It has several tabs in it. lets cover them one by one
- General
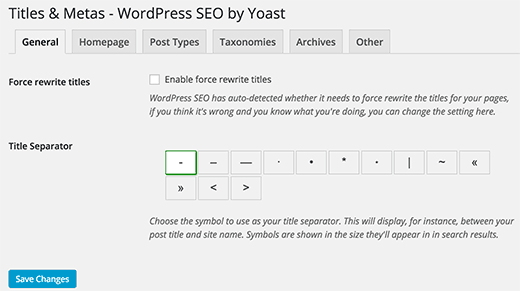
Here you can configure settings related to your site’s title. Wordpress SEO can auto detect if it needs to re-write the site’s title or not. usually its unchecked and you can leave this as it is.
If you want you can choose the symbol separator between post title and site title.
- Homepage
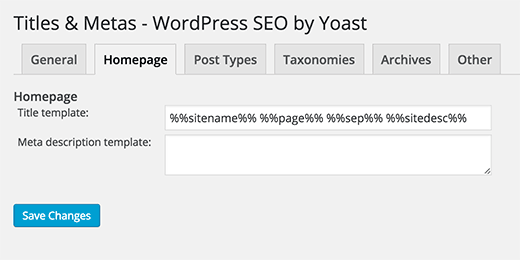
Uder this section of wordpress SEO, you can create a static title, description, and a keywords for you blog. title template allows you to define a way that the title and other meta informations is pulled and organized. once you are done with the changes, clicks save to ensure that all the changes have been executed.
- Post Types
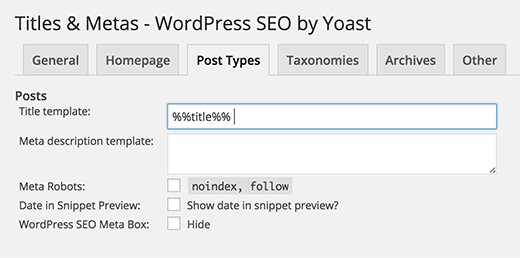
Wordpress SEO allows you to set titles and meta for posts, pages, media and other custom post types. wordpress automatically fill in title template variables for all your post types and leaves meta description template and other fields blank but I strongly recommend to change the title template to the one you actually want to keep and remove the sitename.
If you want to enjoy maximum SEO benefits, I strongly recommend you to manually enter title and description for each post otherwise wordpress SEO will use the title defined here and then descriptions will be add automatically.
By default wordpress SEO hide the dates from search engine snippet and very useful for writing contents which last long. if you want to show dates on your posts, you can check the date is snippet preview
- Taxonomies
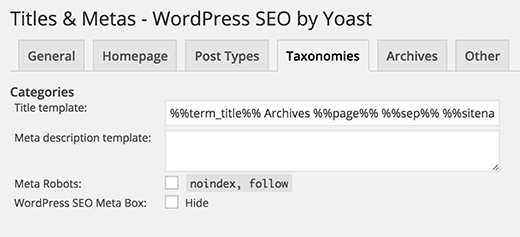
On this tab, you can configure titles and meta for categories, tags and post format archive etc. default title template variable should work for most of the sites. wordpress SEO picks up descriptions from your categories and tags.
If you don't have any descriptions for terms in your categories or tags, then wordpress wouldn’t add meta descriptions in archive for these terms. Checkout guide on categories vs tags
- Archive
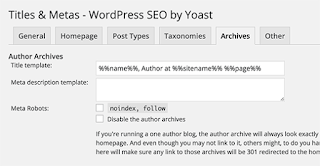
On this tab you can configure title and meta settings for author archive, date archive, 404 pages and search pages(AKA special pages). I is highly recommended to disable this option if and only if you are running a single author blog, because your main blog and author archive should have the same content and this will prevent the duplicate content.
- Others
Step 4. Social
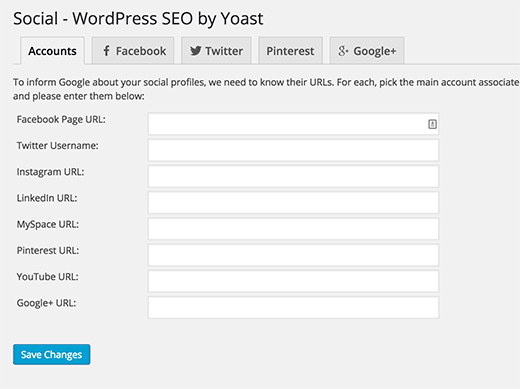
This plugin by Yoast is surely a giant powerhouse when it comes to integration with the social accounts. WordPress SEO integrates your blog with Facebook, twitter, Google+, Pinterest and many more. I will show you how to configure each of them.- Accounts
This tab takes care of your all social accounts. you just need to put in your profile URL of your social account. For twitter, you need to key in your Username.
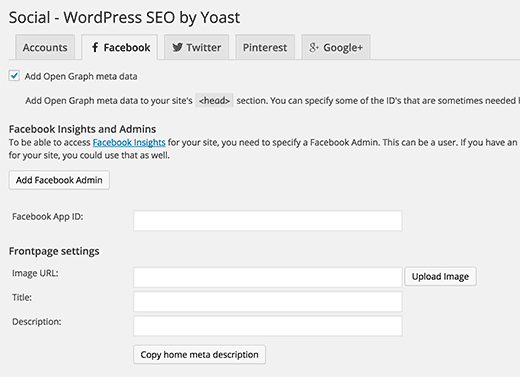
On the facebook tab, first this is to check the option that says add open graph meta data. this will allow wordpress seo to add facebook open graph in your website’s . by doing this, facebook will pick the right thumbnail and other information when your post from your blog is shared on facebook.
Now its time to associate your blog with your facebook profile. this profile can be a user profile or a facebook app(checkout how to create a facebook app). Adding a facebook admin will provide you access to facebook insight for your site.
For Twitter, , you can add twitter meta card (https://dev.twitter.com/cards/overview) to your site’s head section. you can choose what card type to use. I prefer summary with large image.
Prior to configuring this, make sure you have checked the open graph meta data tab under facebook tab because pinterest uses open graph meta data just like facebook. after that you need to supply the site verification code provided by pinterest. login to your pinterest account, go to settings to add and verify your site. you will be provided a meta tag that you need to enter just next to Pinterest verification.
- Google +
I am not getting into details for this because Google is planning to close this service. but till the time you can use Google+. To use this, you must have created a Google+ page for your blog/website. just key in the URL of your Google+ page and enter your blog’s address in about section.
Step 5. XML sitemaps
Sitemaps are the essentials for your blog. it helps you to get your blog indexed quickly and easily and also notifies search engines about your contents. sitemaps also allow you to tell search engines how to prioritize your blog’s contents.
WordPress SEO by yoast takes the pain and makes it pretty easy to add XML sitemaps in WordPress.
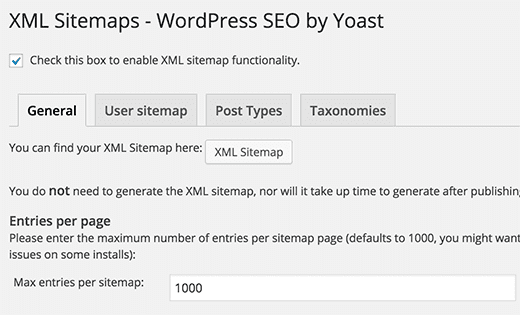
Ensure that the box that says check this box to enable XML sitemap functionality is checked.
The XML sitemap settings are a combination of different tabs.
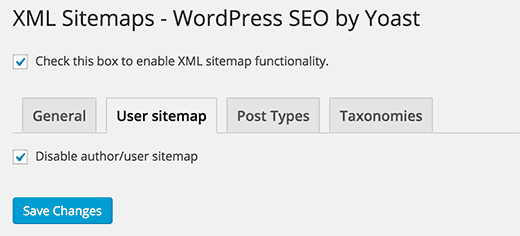
Now click on user sitemap and this will take you to the screen listed below.
make sure that you have disabled author/user sitemap.
At last you need to configure post types and taxonomies tabs.
Disable any post type that you don't want to include into sitemaps. by default wordpress SEO disables attachments from sitemaps. if you are using custom post type that you don't want to include.
Repeat same process for taxonomies. anything you don't want to be indexed can be easily removed.
Step 6. Advanced
This page allows you to configure breadcrumbs, permalink and RSS feeds related settings.- Breadcrumbs
Breadcrumbs (http://www.searchenginejournal.com/breadcrumbs/15022/) are useful for getting search engines to understand the structure of your site thus help users in navigating your site.
you can use your desire symbol from the list. Its just a simple and doesn't impact anything. the default setting should work for most websites however you can change as per your need or likes.
- Permalinks
WordPress by default adds a category base in each url. i.e. /category/. by checking this option you can stripe/remove that part from your category url. this is something a lot of people want.
Next thing you need to do is to remove the .html from the end of your posts. sometimes .html appears at the end of your post which is quite annoying and doesn't look good to see, So if you face the .html problem, this is surely for you.
you also want to remove stop word from permalinks. stop words are nothing but common words used in plain language. removing the stop words may help in getting cleaner URL for your posts and pages.
Redirect attachment URL’s to parent post URL > We know that WordPress allows us to attach images and videos to the posts. but all these attachments get their own URL which are necessary to word. So, if you want to redirect all your media page URL to the original post URL.
The last option is remove ?replytocom variable from comment reply links. leave it unchecked as it is not that necessary.
- RSS
RSS feed section allows you to add backlinks to yourself in the feed content because most content scrapers are using your feed to keep them updated with the new post or any updation in the previously published post. this way you get backlinks from their sites/blogs, and google will know that you are the original source.
you can also use it to add advertisement contents to your RSS feeds.
To make it work, I simply add the following line after the post content section:
“The post %%POSTLINK%% appeared first on %%BLOGLINK%%.”
Step 7. Tools
It was a fantastic journey so far. you have learned how to boost up your blog with WordPress SEO by yoast, a powerful plugin. you have also spent a good amount of time getting these settings right, so you probably want to export the setting as backup(just incase if you mess things up in future). you can also use these setting you are going export as an initial guideline for all your future sites that you are going to use this plugin on.
The bulk editor- this tool allows you to edit the post title and post descriptions in bulk. useful when you have many(500+) posts. but i personally feels that this can cause damage to SEO.
Use rest of the tool carefully as these are not meant for newbie. a tiny mistake can put you in big trouble. any mistake here can make your site inaccessible for search engines.
I have tried to cover everything you need to configure WordPress SEO by Yoast. How this post helped you in configuring the Yoast WordPress SEO plugin?
Share this post with your friends and help them in setting up this amazing plugin.








SEO is the best way to increase traffic on your website, best post. Thanks
ReplyDeleteSEO Services in Nashik | SEO Company in Nashik
Yoast SEO is a WordPress plug-in designed to help you improve some of the most important on-page SEO factors–even if you aren’t experienced with Web development and SEO. This plug-in takes care of everything from setting up your meta titles and descriptions to creating a sitemap. Yoast even helps you tackle the more complex tasks like editing your robots.txt and .htaccess.
ReplyDeleteSome of the settings may seem a little complex if you’re new to SEO and WordPress, but Yoast created a complete tutorial to help you get everything set up. And the team at WPBeginner made this handy video to help you get set up quickly.
This comment has been removed by the author.
ReplyDeleteIt is really a great and useful piece of info. I’m glad that you shared this helpful info with us. Please keep us informed like this. Thank you for sharing. Also explore about
ReplyDeleteWooCommerce Development
WordPress Template Customization
Wordpress Buddypress customization services
Wordpress speed optimization
WordPress multisite services
Psd to WordPress Conversion
Thanks for sharing kind information.
ReplyDeleteFor more information about How to Change Author URL Slug and Base in WordPress? visit here:-
wordpress change author slug
set default author wordpress
wordpress remove author base
how to add author in wordpress
wordpress author page
wordpress change author permissions
Thank for sharing this Wordpress SEO Tutorials. this has made my life easier. now my blog is ranking higher in Google search results page. Thanks a lot.
ReplyDelete