How To Install WordPress Themes

By // 2 comments:
Looking to install a WordPress theme? You must have heard about tons of available paid and free WordPress themes. As you have decided or planning to make your Career As A Blogger, you may want to try out a new theme on your blog until you find the right one that meet your needs. In this tutorial, I will provide you detailed step by step instructions on how you can install a theme in your WordPress Blog.

Step by step guide on How to install WordPress themes
How ro install WordPress themes

WordPress theme can be installed in 3 ways:

1. Search and Install
2. Upload and Install
3. FTP

Install Latest WordPress before Installing A WordPress Theme

Premium themes are powerful and make use of all the latest WordPress functions to ensure the coding of the themes are as best as possible with highly killing customization & optimization features, make sure you have the latest version on WordPress before you apply a new theme.

Search and Install

This is probably an easiest way to install a new theme on your WP blog. Login to your WP dashboard, go to appearance>Themes. Once you are on the theme page, click on Add New button at the top.

On the next screen you will see some options like featured, popular and latest, you can search for a theme with specific feature by clicking on feature filter, or you can search the theme in the search bar. In the search bar, you just need to key in the name of the theme you want to install.

Feature filter allows you to search for a theme with specific features. Below image is for your reference:

WordPress themes installation

Based on your search criteria, you will see a single theme of a list of themes that match your criteria. When you see the theme you want to install, hover your mouse on the theme to reveal preview, install and detail option. It is a good practice to read the details of the theme you are about to install. Then check out its preview. If this is how you want your blog to look  go ahead and Install it. Once it is installed, Click on Activate button, and you have successfully installed and activated your WP theme.

Upload and Install

You have learned how to search and install a WordPress theme from WordPress dashboard. You search a theme and install. Pretty easy? Yes it is. However the first method- Search and Install method only allows to free themes that are on WordPress repository.

Once i have seen an amazingly customized, light weight and eye catchy theme. I wanted to get that right way. I went to my WP Dashboard>Appearance>Themes. I searched everything but didn't find it. So I went back and did start a research on it why i didn't find the theme in WP Dashboard. Later on I found that most of the commercial premium themes aren't accessible from Dashboard. So how I an gonna get that now. Since this was a paid premium theme so I went ahead, purchased it and I got a .zip file.

What next now? I need to install it on my blog.

Go to Dashboard>Appearance>Themes>Add New>Upload Theme. Click on Choose File and then Key in the location where you have your downloaded theme(.zip file) is located and click on Install Now.


Important : A common error a lot of people come across while installing a new theme is that "the theme is missing style.css and can't be installed." This pop up error indicates that downloaded zip file is corrupted and doesn't have style.css file in it. So go and download a valid theme file and verify that it has a style.css file.

Once your theme is installed, you will see a success message along with the link to preview and activate it as shown in below image:


Depending upon the theme, it may add additional setting option that you need to configure.

Note: Theme upload functionality in only available for self-hosted worpress.org users. You won't see add themes option if you are using free WordPress.com. free WordPress.com has its limitations that's why it doesn't allow us to upload themes. In order to use theme upload feature your blog has to be self-hosted (free WordPress.com vs self-hosted WordPress.org). If you are using free wordpress.com and want to switch to self-hosted WordPress, you should read : how to migrate from free WordPress.com to self-hosted WordPress.org

Hosting companies you should check : 

Bluehost
Hostgator

These two companies are the giant in hosting industry. Choose any of them and start your blog today.

FTP Method To Install Wordpress Theme

You are still in high school if you don't know how to use ftp to install a wp theme. If automatic installation fails, or you have decided to go for a premium theme that isn't available in WordPress repository, you will need to use this alternative route to install your theme.

You need to know several details about your ftp server and hosting account like: 

  • Domain name/server address
  • Hosting/server user name
  • Hosting/server password
  • Port Number of your server.
  • Location of your WordPress installation inside the hosting account (usually into the public_html folder)

Then you need a ftp client. Filezilla is an open source program available for multiple platforms and does a good job. Remember, this is not for beginners because it is little bit more advanced.

Assuming that you have downloaded a premium theme you want to install. It will be in a  .zip  file format. Extract the theme file as you will have to upload extracted files only. Make sure that your theme package contains style.css

Open FileZilla. Login with your server address, host name and password. Then key in the port number. After you key in all the information, click on quick connect, and it will connect to your host. Once you are connected to your host, go to the path  /wp-content/themes/  and upload all the theme extracted files. Once you have uploaded the theme go back to wp Admin panel>Appearance>Themes

The theme you just uploaded should be listed here. Hover your mouse on top of that theme and click on activate. Now you can start customizing it for your needs and then you can show off a brand new look to your blog readers.

Since you have learned how to install WordPress theme you should also check out the 3 different ways to install WordPress plugins.


If you a complete beginner and want to setup a WordPress blog, read an exclusive WordPress guide for beginners

Since there is high popularity of themes hence developing WordPress themes has become an attractive profession. Hundreds of new WordPress themes are released every month. But unfortunately not all of them are well coded, doesn't follow coding best practices and coded professionally.

A theme that is not well coded can impact in your blog's performance significantly. Therefore, before you install any WordPress theme, take some time to read the documentation of the theme, reviews and ratings etc.  Always install a theme from trusted sources. When I say trusted sources I mean to say reputed and reliable developers only. Check if they provide good tech support too.

I have tried to make theme installation process as detailed as possible. Still have a question? Feel free to ask via comment. If you find this post handy, share it on Facebook and Twitter. Don't forget to bookmark to stay up-to-date. Let us know how this post helped you?

Google Adsense HeatMap : Best Adsense Placement Guide

By // No comments:
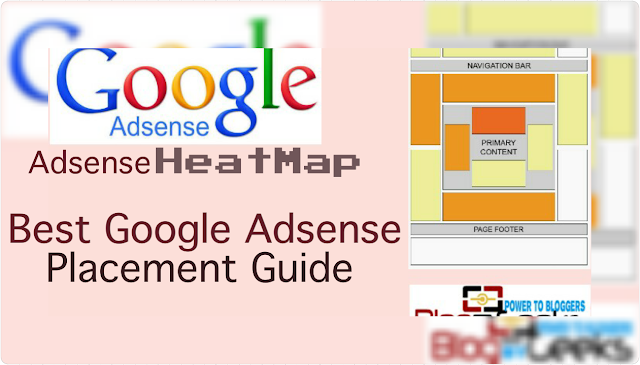
Google Adsense heatmap : best Google Adsense placement guide
Google Adsense HeatMap
It is always exciting to increase Adsense ads performance but also consider the user experience and Google Adsense policies when placing Adsense ads on your blog. As we know that Google Adsense is a pay per click (PPC) program and ads are shown basis the keywords which play a vital role for an ad to show up on your blog. When we talk about how to increase Adsense earning, Adsense HeatMap comes in our mind.

Without a doubt, Google Adsense is the best PPC program to monetize your blog which allows you different ad size to insert in your blog and also offers high CPC for each click.

But what is the benefit of different ad size and high CPC rate when visitors don't click on your ads. Nothing.

Google Adsense is the best way for the bloggers to make money online from the blogs and websites by placing ads but the problem is to find out the best place to place the Adsense ads. Prime focus of any blogger should be on the quality content and keep the user experience. Do not put ads in the middle of the post because it looks annoying. Google panda updates made it clear to have less ads around  content and above the fold.

It's always the game of placing the right ad at the right spot. Ad placement is quite tricky but playing smart by placing your adverts with little tricks can help you to achieve the best results but keep the user experience in mind. Even you can double your Adsense income.

Google Adsense heat map Image
How to use Google Adsense heatmap- official
Google Adsense heatmap- official
This is an exclusive guide which might help you to increase your Adsense earning. Have a look at the official Google Adsense heat map which clearly talks about the best Adsense placement without annoying users.

While using Adsense ads on your blog do you think of following points:
Why your readers are here?
Which is more important for you- content or advertisements
Where to display ads without compromising user experience.

Placing Adsense ads at right place and at the same time concentrate on the quality of the post that you write can potentially lead to increase your Adsense earning.

Here are some tips and ideas to best advertisement placement :

Before we move ahead, have a look at the maximum number of allowed Adsense ad units on a web page.

Ads above the fold yield the best results and it is a strong recommendation by Google. Be specific about keywords to have a high paying ads on your blog.

Note : Text ads before the post have better CTR as compared to image ads.

So far we were considering the user experience but if your prime focus is to make money online by Google adverts, you can place link ads between the content. You can also use Google search ads at the best possible and visible place on your website to increase your Adsense earning.

There are few other places to place Adsense ads :

Sidebar banner
Above the post
Below the post

I would suggest you to play smart while placing advertisements without downgrading your users experience and instead if keeping empty space on your website, it is an good idea to utilize that space by placing ads.

Learn how to use Google Adsense : The best advertising program for your blog to make money online

You can also use Google Adsense alternatives to make money online.

Fruitful read : Is it possible to make money online without Google Adsense?

Do you use Adsense heat map? What is the best ad placement on your blog? 

Google Adsense Account Approval Process(New)

By // 13 comments:
This is the new process that Google follows to approve Adsense Applications (Year 2015)

How google approve Adsense applications (new process)
Adsense application approval (new process)

Google Adsense has recently introduced a new application verification process for publishers. Google Adsense has become the industry standard when it comes to displaying contextual ads on your blog. No doubt Adsense is the best and most popular monetizing program for bloggers.  Until now Google Adsense approval process was simple and easy : you create an Adsense account, submit your application, Adsense team reviews it and accept you in the AdSense program, and then you implement ads to monetize your blog. Pretty simple? Yes, It was.

But now Google has changed the procedure to review new Adsense application. Earlier it was a one step verification process but now Google has decided to approve an AdSense account in 2 steps.

#1. Create an account>submit your application>Adsense team will review your application and partially approve your AdSense application. Adsense team will notify you about this approval.
In this step, Google Adsense teams do some initial checks on your blog and information provided in the application.

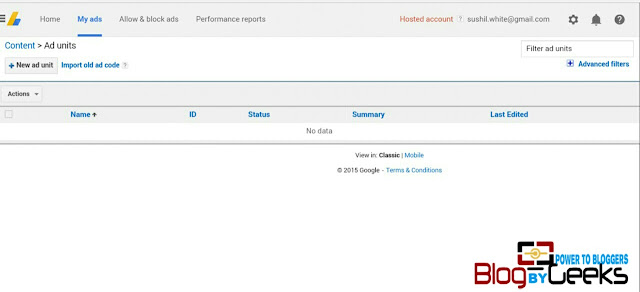
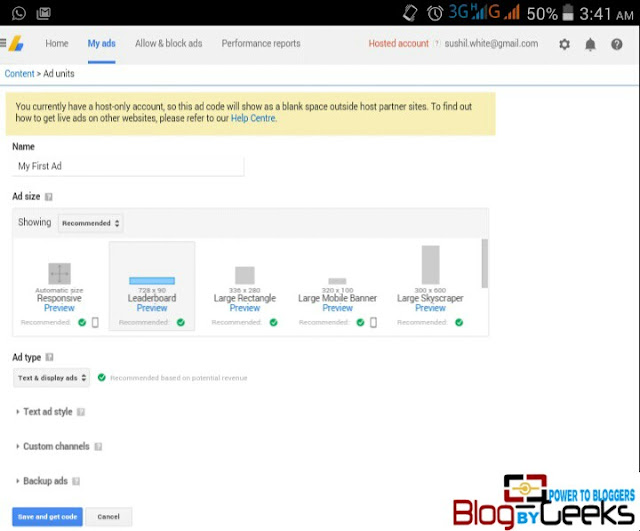
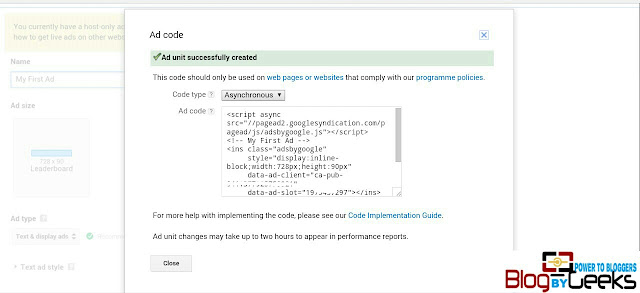
#2. Once your Adsense application passes the initial stage, Adsense team will grant you access to your Adsense account. Login to Adsense account. Go to my ads. Here you will get many options to customize the look of ad.  Customize it as per your preference, click on get code. Copy this code and paste at where you want to see it on your blog.

Please remember this is not the final approval. Once you have implement these ads code in your blog and these will be showing as blank and will blend with the background of your blog. You can place upto 3 ads on one page hence don't just bombard your blog with lots of ads. You won't be paid for any click on these ads until your Adsense account passes the second review. Now again Google Adsense team will review your blog and ads placed. The only purpose to conduct the second review is to ensure that your blog meets certain requirements to successfully run Adsense ads on your blog. If your blog meets the AdSense standard, Adsense team will approve your application. This is the final stage of approval. Now your Adsense account is approved and ads will show up on your blog. You will get a second email from AdSense team conforming the same.

Note: Until your Adsense application doesn't pass second review, you however, will be able to login to Adsense account but it will show a message saying " your account is under review."

UPDATE: Once you apply for an Adsense account, you get an instant access to your Adsense account. Adsense account sometimes doesn't show any status - "under review", So Don't panic. Just put some ads code and wait for Adsense team to review. Upon final review review you will get an approval email.

Don't put too many ads on a single web page.  Read-- How many Adsense ads are allowed on a single web page.

Google is becoming strict day by day and that is why they have changed the Google Adsense approval process. This new Adsense approval process takes more time to approve AdSense application as approval is split in two steps now.

New Process of AdSense approval:

Sign up for Adsense account(Google Adsense sign up page)
Provide information about you(name, address, phone#) and the blog's URL which you want to monetize.

Within 1- 2 days AdSense team will review you application. If it looks good to them, you will pass the first review. Adsense team will communicate you the same via email.

Upon first approval you will automatically get access to your AdSense account. Login to AdSense account. Click on my ads to create a new ad (I am not getting into detail here as all the steps involved to create and customize a new ad are self explanatory)
Google Adsense dashboard
Adsense Dashboard


My ads in adsense dashboard

Paste the ad codes on your blog. As per Google you should not use more than 3 ads on a web page so be careful. These ads will not show up on your your blog and will blend with the blog background. Now Adsense team will initiate the second/final review. It mat take about a week. You're lucky if you get it before. After the final approval you will get a confirmation email.

Why google adsense is the best advertising program for your blog


After the final approval confirmation, ads you had placed on your blog will be visible. When somebody clicks on those ads, you will get paid some amount depending on advertiser. Google Adsense pays only for a valid click. Don't try to encourage people to click on your ads against their wish. As I told you before that Google is very particular and strict. If Google finds any activity in your Adsense account which is violating the TOS,  your Adsense account will be disabled immediately and banned permanently if you don't acknowledge the Google's TOS. All your earning will be forfeited. So i suggest you don't do anything which is against Google's policies.

Once your AdSense earning will reach $10,  Adsense team will mail you a PIN to your address provided by you at the time of applying for AdSense.

You need to enter the PIN in your Adsense account to complete the last step. Google sends you a PIN to make sure that you are the real identity. Congratulation you have complete all the steps. Once your Adsense earning reaches $100, Google will send you check or wire you your earning. Most of time, it takes hell lot of time for a check to reach you (depending upon geographical location), I recommend you to enable direct bank transfer for your Adsense earning.

Is your Google added account rejected? Don't worry. There are many ways to monetize your blog. There are many Adsense alternatives you can use to make money from your blog.

You should create a blog today to start earning money.

Read : Ultimate WordPress Guide for complete beginners

Have you applied for Adsense recently? How was your experience with the new Google AdSense approval process?

Like us on FB and +1 us on Google+
Share this post on social media.

How To Create A Free Blog On The Blogspot Blogging Platform

By // 4 comments:
Create a free blog on blogspot blogging platform
Create a Free Blog on Blogspot
Having a Blog is a great way to put your thought before the world, thoughts that you like about something. Blogging is a decent profession if you are wise enough to take a pen and paper and start writing.  You can also monetize your blogspot blog by integrating it with Adsense. Read my exclusive post on Google Adsense Guide.

There are number of blogging platforms to create a free blog for yourself. Blogspot is one of them. Blogspot blogging platform is provided and managed by Google. Blogspot has some limitations too but it is a great start for newbies who don't want to make an initial investment for domain name and web hosting. I have already covered up a detailed post on Web Hosting.  My personal choice for blogging is WordPress with your domain and Web Hosting. Why? The reason is self-hosted WordPress blogs are more powerful in terms of functionality, customization and provide complete control on your blog. Read : Blogspot or WordPress- "Which blogging platform to use?" To understand the major differences, and to know which blogging platform suits you best?

I get emails throwing questions at me like - How can i monetize my blog?, How to make money online with my blog,  Which is the best advertising network for a blog to make money online?  What does this mean? These questions cleverly tell us that majority of people (almost everybody except few) are looking and trying to make money from their blogs or websites. Since Self-hosted WordPress blog has a cost attached for buying the domain name and Web Hosting hence I would recommend newbies to start creating a free blog on blogspot blogging platform to take the experience and then advance & become more professional blogger with your self-hosted wordpress blog. This way you won't have to pay anything and later on you can migrate from BlogSpot to Self-Hosted WordPress.

BlogSpot offers basic features to create a free blog. As I mentioned, it is a good way to learn and start blogging as a career.

I remember the time when I started blogging for the first time. It was my passion. Now its more than a passions. It was a new concept for me with less knowledge and limited money in pocket to spend on domain and web hosting. I had a tough time setting up my free blog on blogspot.com. So I have written this DIY Guide on how to set up a free blog on blogpost blogging platform. This post will help you get started with your free blogspot blog.

Before I start with this tutorial, there are couple of things you should be aware of :
BlogSpot is an online blogging service owned by Google. It offers you to create a free blog on Google server. Since your blog is hosted on Google server hence all of your blog photos are hosted on Picassa, which is an another service by Google. So blogspot is completely Google centric platform and gives you no control on your blogspot blog.

If you want to create a professional blog with an aim to make money online, then this free blogging platform is not for you. Click here to know why? I would rather recommend you to create a blog using WordPress. It is easy to set up a WordPress blog. With the help of our free Exclusive WordPress Guide For Beginners by BlogByGeeks, you will set up your WordPress Blog in Just 10 Minutes.

Step by Step DIY Guide to create Your blog on Blogspot 

#1. Creating a free blogspot blog

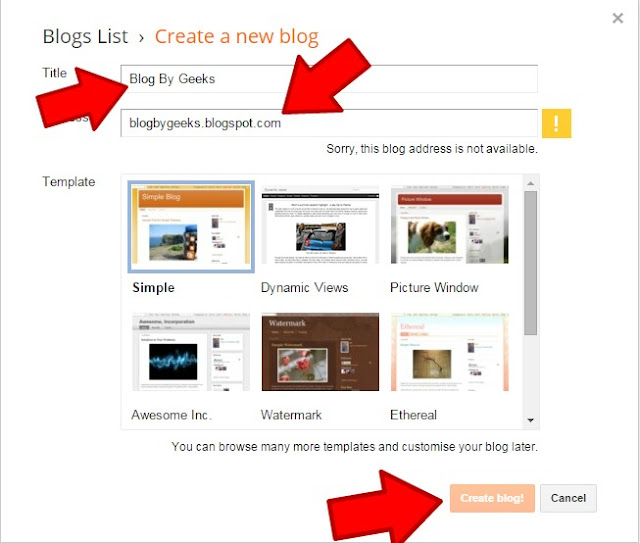
Head over to blogger sign up page and login with your Google account. A Google account can be non gmail. That means you can login to blogger with non gmail id as well. If you don't have one, create one to use blogger. Click on Create a New Blog. Name you Blog now as shown in the screenshot. If your blog name is taken by someone, think of a new blog name.
Note: You should select a blog name that can later brand your custom domain.
Blogger--Create a new blogspot blog free

Now its time to choose a theme for your blogspot blog(you can change it later)

Click on create blog! button and your blog is created.

#2. Blog theme customization

You should change your blog's default template because it is generic and doesn't look nice. Now its time to apply a cool theme on your blog. Just Google it to find a good responsive theme for your blog niche. Download and extract it. You need to upload .XML file to your blog.

Go to your blogger dashboard--Template--Backup/Restore--select your template(.xml file)

I have listed 5 Best SEO optimized responsive blogger templates that you can download and install on your blog.
Blogger--Upload a new template

Click on Upload and Done.

Now your blog is ready but wait, you aren't done yet. You need to start posting your content. I recommend you to create few pages such as About, Privacy Policy etc. About page should describe your brief info and what your blog is all about. Similarly Contact page contains the email Id of the blog owner etc. About page is important from readers perspective as they get to know about you and your blog.


Blogger- Dashboard- customization

Go to Layout and make necessary changes or addition. You should also add a cool logo and favicon. You can add widgets too. These things are self explanatory hence I am not getting into deep here.


Monetize your blog with Google Adsense

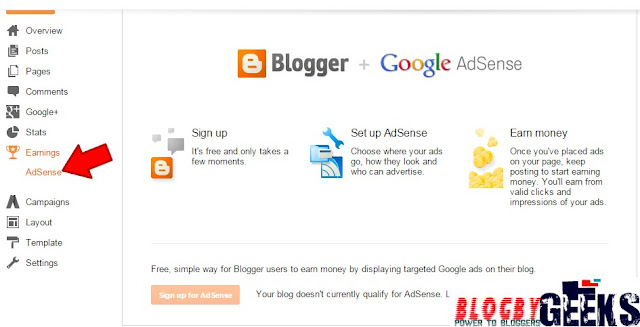
Once you have a few blog posts up and running, you can go to settings--Earnings--and enable Adsense. This way you can also earn money from your free BlogSpot blog.  Learn how you can sign up for an Adsense account.

Sign up for Adsense Blogger

Your blog is almost ready, and you can start writing posts. Once you have signed up doe Adsense, Adsense team will review your application and if everything ia as per their expectations, they will approve your Adsense application. You should have atleast 10 quality posts to qualify for Adsense program.

Read: Google Adsense approval process (New)

This post is for everyone who doesn't have a blog and wants to start a blogging journey.  Blogspot blog doesn't cost a dime but not for serious and professional blogging. If you want to take a more professional platform for blogging, you can head on to my WordPress Guide for beginners.

There is always a discussion about Blogger vs WordPress. Click here to read which is better and why?

How did this post helped you to create your free blog? If you like this post, share it on Facebook, Twitter and Google+ and subscribe ua for the latest updates.