

When I started blogging for the first time, I wasn't aware that stats of the blog plays an important role for your blogs credibility. As time flies, I realized that stats of a blog is the key to a successful blog. It doesn't business if your blog gets 1 view or a million views in a daylight, you compulsion to have a stats program which helps you to track your blog traffic and analyze them.
It is important to understand how audience interacts with your website, and to understand it we have a tool called Google Analytics, which gives you insight into how visitors use your site, how they arrived on your site(traffic sources of your website) and most important how you can keep them coming back. Google Analytics is basically a web analytics service that was launched in 2005.
Google Analytics has become industry for analysing website traffic and today I’d show you what the service offers and how you can use it with your blog/website.
Data pulled by Google analytics tool is extremely useful, and it can help in numerous ways. You can use the user data to make sure that your blog will be compatible with your audience. If most of your users don't have flash support on their device, you should probably avoid adding flash contents. Similarly, if they are on 1280 screen resolution, then make sure that your blog is compatible with that resolution or smaller. Same way if analytics data shows that most of your visitors are from Germany and are using mobile devices, you may want to add language support to your blog and ensure it displays well on smaller screen.
Most important, What I do is, if Google analytics data shows that users are spending more time on my blog in the morning, I switch up my posting schedule to take advantage of those early visitors.
Google analytics shows where did your visitors arrive on your website from( for example: search engines, direct links, referral links from other site etc). It tells you the percentage of your visitors came from each of these sources. Google analytics also shows you what percentage of visitors clicked on which link on your website and much more.
With the help of the benefits provided by Google analytics tool, you can work your contents around your users and focus on strategies that work for your blog.
First you would need to create a Google analytics account. To do this, visit Google analytics sign up page.
You will see a screen like the one below. If you already have a gmail account, then you can sign in with your gmail. Click on image to login to Google analytics.
If you don't have a gmail, you would need to create a gmail account in order to get into Google analytics tool.
Once you have a gmail account ready, you will be prompted to screen like the one below. This is where you will sign up for Google analytics with your gmail account.
Once you are into Google analytics, you have to choose between a website or a mobile app, make sure website is selected.

Rest of the information required are quite self-explanatory.
You enter your Account name. Choose your desired name. All the blogs/sites you are running will be listed under this account name. Key in your website name and its URL. Select http:// or https:// from drop down menu. Next thing you need to do is to select industry category your blog/site fall under. Since BlogByGeeks is a blog based on technology hence I went ahead and selected appropriate option from the drop down. I have already written a post on how to select a niche for your blog. Set your timezone according to your geographical location. If your geo location is India then you should probably not select timezone of United State as this can mess up things like the time you setup to publish a post would be as per United State not India.
Note : You can have multiple blogs listed under Account Name but I recommend to keep one analytics tracking ID for one blog. Read : why you shouldn't create multiple property under one account name.
Pretty easy so far. Lets move on to next steps.
You have entered all the information Google analytics required to generate a unique tracking ID for your blog you entered in last step. Click on the get tracking ID button. You will be presented with Google analytics terms and services, which you must agree to, so read them carefully and click on I agree button.

Now you will be presented with a piece of JavaScript code. This is nothing but Google analytics tracking code for your blog. Leave this tab open as you will need to revisit it, once you have installed the code in your blog.

What next? Now its time to make this code to generate dynamic statistics for your blog.
Keep in mind that code should be placed just before the closing tag of your blog.


Read - https://support.google.com/analytics/answer/1008080?rd=1

Alternatively, you can add the tracking code to your theme's functions.php. But before you paste it, please make sure that you have read An exclusive beginner's guide to pasting snippets from the web.
You need to paste the code right before ?php
Read : 3 ways to install plugins in WordPress
Features and other details of Google Analytics by Yoast :
https://wordpress.org/plugins/google-analytics-for-wordpress/
How to install and configure Google Analytics by Yoast : http://kb.yoast.com/article/118-installation-guide-for-google-analytics-for-wordpress
Go back to the dashboard of your Google Analytics account, click on admin at the top of the page and under property, choose your site and then click on tracking info.
If tracking status is "Receiving Data", then Google Analytics is successfully added on your site. Now to get your site's overview, click on Reporting tab at the top of the page.
Please note: It may take Google upto 12-24 hours to provide you with the stats of your blog, so be patience and wait for some time while Google initialize the Analytics for your blog. Once you start receiving the stats, it means Google Analytics is working fine on your blog.
Note : This is only for Self-Hosted WordPress.org blog. If your blog is running on free WordPress.com then you won't be able to have Google Analytics attached to your blog. But this is not an end of the world. May be it's time to learn how to migrate WordPress.com to self hosted WordPress.
Google Analytics is a must have for every blog. I hopw you have enjoyed this introduction to Google Analytics. Subtribe to BlogByGeeks so that you are always keep up to date with the fresh articles around. If you need any help then feel free to ask. Don't forget to share this article with
 |
| Google Analytics |
It is important to understand how audience interacts with your website, and to understand it we have a tool called Google Analytics, which gives you insight into how visitors use your site, how they arrived on your site(traffic sources of your website) and most important how you can keep them coming back. Google Analytics is basically a web analytics service that was launched in 2005.
Google Analytics has become industry for analysing website traffic and today I’d show you what the service offers and how you can use it with your blog/website.
Why you should use Google Analytics?
Google analytics help you analyze your visitors traffic, figure out who your audience is and what they are looking for. Using Google Analytics you can find out information such as their geographical location, which browser they are using, their device platform- Android , windows or Mac, Devices- phone, PC or tablet, JavaScript support, flash support and even their device resolution and language. This tool analyse you what time visitors landed on your site, time spent by them on your site/blog, and the bounce rate(the percentage of visitors who left your site after their first visit). These information can also help you better tailor the design of your site/blog to enhance visitors experience and helps you to decrease bounce rate and increase the depth of page views.Data pulled by Google analytics tool is extremely useful, and it can help in numerous ways. You can use the user data to make sure that your blog will be compatible with your audience. If most of your users don't have flash support on their device, you should probably avoid adding flash contents. Similarly, if they are on 1280 screen resolution, then make sure that your blog is compatible with that resolution or smaller. Same way if analytics data shows that most of your visitors are from Germany and are using mobile devices, you may want to add language support to your blog and ensure it displays well on smaller screen.
Most important, What I do is, if Google analytics data shows that users are spending more time on my blog in the morning, I switch up my posting schedule to take advantage of those early visitors.
Google analytics shows where did your visitors arrive on your website from( for example: search engines, direct links, referral links from other site etc). It tells you the percentage of your visitors came from each of these sources. Google analytics also shows you what percentage of visitors clicked on which link on your website and much more.
With the help of the benefits provided by Google analytics tool, you can work your contents around your users and focus on strategies that work for your blog.
Getting Started:
Generate Google Analytics Tracking Code
This tutorial assumed that you already have a Google analytics account. If you don't have, it is easy to sign up.First you would need to create a Google analytics account. To do this, visit Google analytics sign up page.
You will see a screen like the one below. If you already have a gmail account, then you can sign in with your gmail. Click on image to login to Google analytics.
 |
| Sign in to google analytics |
If you don't have a gmail, you would need to create a gmail account in order to get into Google analytics tool.
Once you have a gmail account ready, you will be prompted to screen like the one below. This is where you will sign up for Google analytics with your gmail account.
 |
| Google Analytics Sign up |
Once you are into Google analytics, you have to choose between a website or a mobile app, make sure website is selected.

Rest of the information required are quite self-explanatory.
You enter your Account name. Choose your desired name. All the blogs/sites you are running will be listed under this account name. Key in your website name and its URL. Select http:// or https:// from drop down menu. Next thing you need to do is to select industry category your blog/site fall under. Since BlogByGeeks is a blog based on technology hence I went ahead and selected appropriate option from the drop down. I have already written a post on how to select a niche for your blog. Set your timezone according to your geographical location. If your geo location is India then you should probably not select timezone of United State as this can mess up things like the time you setup to publish a post would be as per United State not India.
Note : You can have multiple blogs listed under Account Name but I recommend to keep one analytics tracking ID for one blog. Read : why you shouldn't create multiple property under one account name.
Pretty easy so far. Lets move on to next steps.
You have entered all the information Google analytics required to generate a unique tracking ID for your blog you entered in last step. Click on the get tracking ID button. You will be presented with Google analytics terms and services, which you must agree to, so read them carefully and click on I agree button.
Now you will be presented with a piece of JavaScript code. This is nothing but Google analytics tracking code for your blog. Leave this tab open as you will need to revisit it, once you have installed the code in your blog.
What next? Now its time to make this code to generate dynamic statistics for your blog.
How to Install Google Analytics Tracking Code in WordPress blog.
There are 3 ways to install Google Analytics Tracking Code in your WordPress blog.
- Direct paste
- Functions.php
- Plugin (recommended)
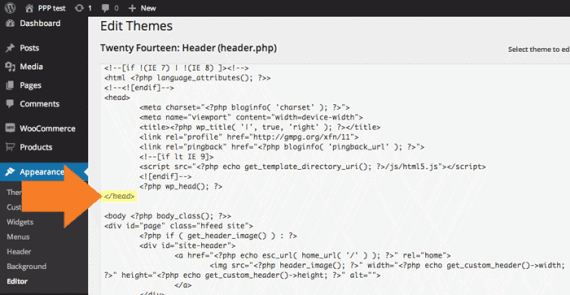
Direct paste method:
Copy the code and paste it in your theme's header.php just beforeKeep in mind that code should be placed just before the closing tag of your blog.
Read - https://support.google.com/analytics/answer/1008080?rd=1
Functions.php method
Note: only use this if you know what are you doing. It is highly recommended to have a full backup of your WordPress blog before proceeding.Alternatively, you can add the tracking code to your theme's functions.php. But before you paste it, please make sure that you have read An exclusive beginner's guide to pasting snippets from the web.
You need to paste the code right before ?php
Plugins method
There are tons of plugins available to add google analytics to your site however Google Analytics by Yoast is probably one of the best plugin to add Google Analytics in your WordPress blog. Installing a plugin is quite simple.Read : 3 ways to install plugins in WordPress
Features and other details of Google Analytics by Yoast :
https://wordpress.org/plugins/google-analytics-for-wordpress/
How to install and configure Google Analytics by Yoast : http://kb.yoast.com/article/118-installation-guide-for-google-analytics-for-wordpress
How to check if Google Analytics is active and working on your site
Once you have setup the tracking ID in your website using any on the three methods, your Google Analytics Tracking status should change.Go back to the dashboard of your Google Analytics account, click on admin at the top of the page and under property, choose your site and then click on tracking info.
If tracking status is "Receiving Data", then Google Analytics is successfully added on your site. Now to get your site's overview, click on Reporting tab at the top of the page.
Please note: It may take Google upto 12-24 hours to provide you with the stats of your blog, so be patience and wait for some time while Google initialize the Analytics for your blog. Once you start receiving the stats, it means Google Analytics is working fine on your blog.
Note : This is only for Self-Hosted WordPress.org blog. If your blog is running on free WordPress.com then you won't be able to have Google Analytics attached to your blog. But this is not an end of the world. May be it's time to learn how to migrate WordPress.com to self hosted WordPress.
Google Analytics is a must have for every blog. I hopw you have enjoyed this introduction to Google Analytics. Subtribe to BlogByGeeks so that you are always keep up to date with the fresh articles around. If you need any help then feel free to ask. Don't forget to share this article with
0 comments:
Post a Comment